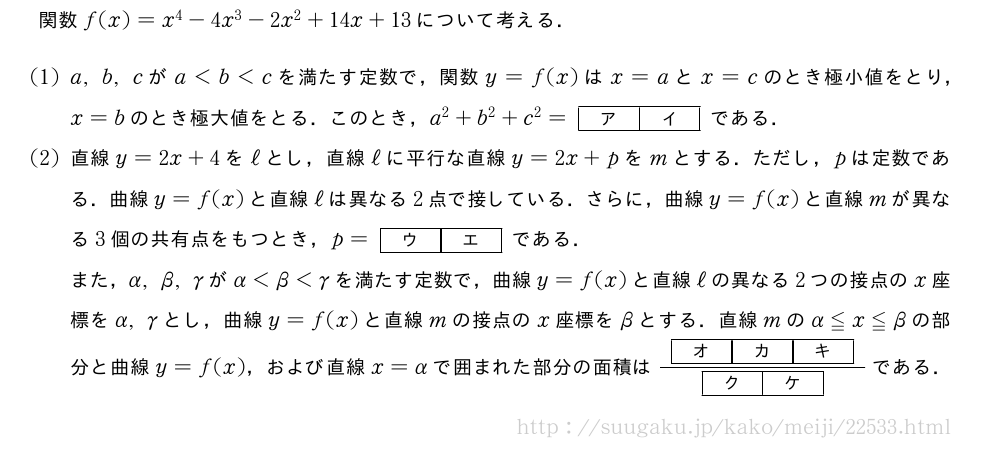
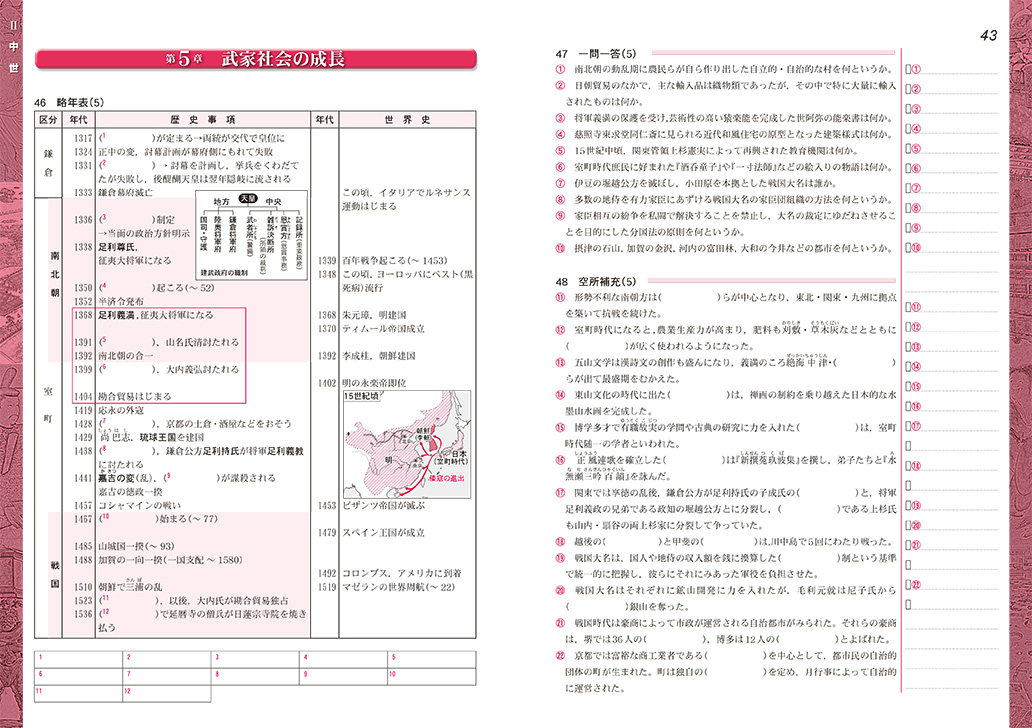
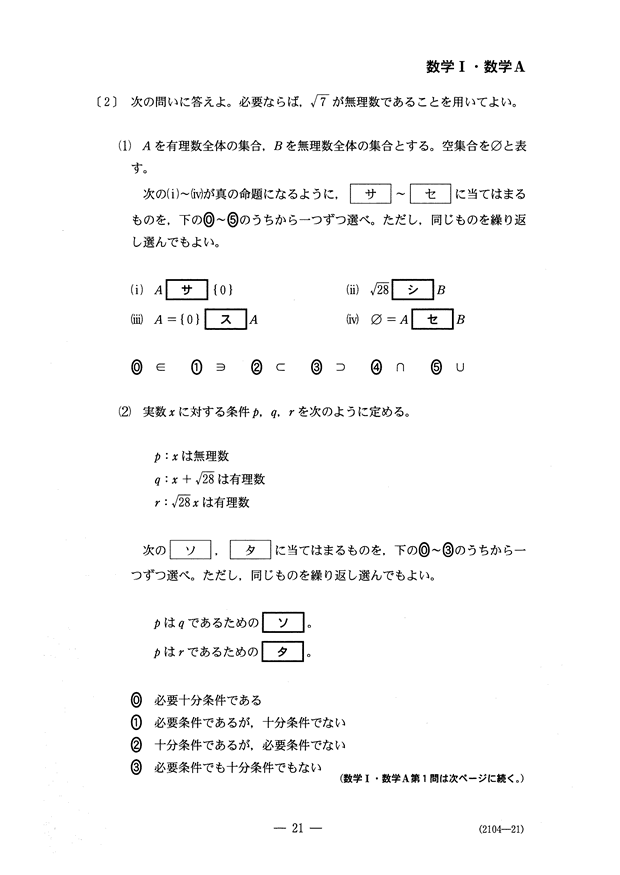
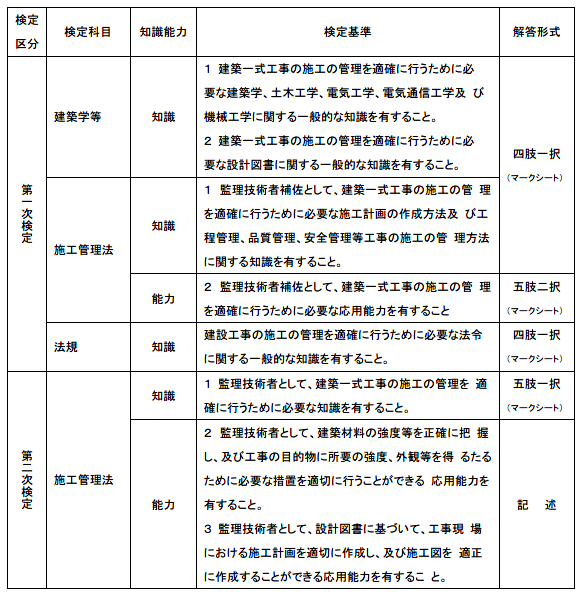
How To Addremove Navigate Bw Keyframes In After Effects
To create a add keyframe shortcut after effects good title sequence requires a certain understanding of keyframe animation; before we get into animation, we want to show you here we are going to show you how to access the titling preset data base in after effects; 1. type in a text layer. I've gone through this dozens of times on this forum. to guarantee success you need to set a keyframe. here goes:select your shape (rectangle 1) and right click and select convert to bezier pathopen the rectangle 1 path and set a keyframecopyselect the layer that you want to add a mask tochoose the pen toolclick anywhere on the layer to set the first vertexif you are attempting to put a mask. Keyframe. keyframe interpolation; setting, selecting, and deleting keyframes add responsive design to your graphics export an after effects project as an. In after effects, select the layer you want to animate. you can add keyframes for parameters including anchor point, position, scale, rotation and opacity. move the timeline to where you want to place a keyframe. then click the stopwatch next to the chosen parameter.
I know that you can add a keyframe to layer position with alt+p, etc \\yay/ but does anyone know if there is, or you can assign a keyboard shortcut to add a keyframe to a shape layer trim path? it would save a hell lot of time. After effects can be a complicated program, and while customizable after effects templates and internet tutorials can help, there are still a few ins and outs that can elude even advanced animators. we’ve compiled a list of the ten biggest and most common ae mistakes out there—and how to avoid them.
Adobe After Effects Adobe Help Center
How to add keyframes in after effects 1. select your starting position and add a keyframe with the stopwatch icon set the first keyframe by moving your layer 2. move to the second/end position now that we’ve set out first keyframe successfully, we need to set another to create 3. change the. Introduction to adding keyframes in after effects. adding keyframes in after effects is mostly used in the animation process, its main tool is to animate. keyframes are nothing but markers placing in the timeline for layers and change the values to create animations like position, scale, rotation, and color etc, keyframe animation works like we create a point in starting and ending points and. Effects can be applied to a selected layer by choosing an effect from the effect menu in the menu bar. you can search effects in the effects and presets panel, and you can drag and drop those effects from the panel directly onto any layer in a composition. access effects in the timeline on a selected layer by pressing e on the keyboard.
Solved Convert A Shape Path To A Mask Path Adobe Support
How To Set Keyframes In After Effects School Of Motion
A Guide To Basic Keyframing In Adobe After Effects Pond5
Shotcut has amazing audio effects. this tutorial i will tell about 20 shotcut audio effects and what can you do using these effects. how to add filters you can add shotcut audio effects using shortcut key ctrl + 6 or you can click the filter button on the toolbar. to add audio effects you must select an audio file you need to add effects. Option +click property shortcut. add or remove keyframe at current time. 13. properties and groups in effects controls panel. command + ` (i was interested in the adobe after effects shortcuts. your table helps to speed things up greatly! ) comment 1 by ganesh apr 25, 2011 at 12:56 am reply. thamk you for the shortcuts very usefull..
How to add keyframes in after effects first, load your current after effects project and find the property that you want to adjust. if you click the stopwatch icon next to the property name, keyframing will be enabled. you can also go to "animation" > "add [x] keyframe", and specify the layer that you want to animate. How to add keyframes at current time in adobe after effects cc 2018 to add keyframes you don't necessarily have to tweak the parameter. you could just clic. Thankfully, there's this easy "add a keyframe" shortcut after effects ships with. to add a keyframe at the current time, simply hit option with the corresponding shortcut for anchor point, position, scale, rotation and opacity. note: you can use the same keyboard shortcuts to remove a selected keyframe. 2. easy ease selected keyframes.
You can also click on the keyframe to add a keyframe and drag it around to change the speed. finally, you can use the curves to smooth speed points you have already created or create them from scratch by clicking the keyframe button to create a keyframe at the playhead. you can create multiple keyframes in this way and then smooth them. 3. Linear keyframes are almost never helpful in after effects. instead as a motion artist you probably use a mixture of easyease keyframes and custom eased keyframes using the graph editor. to apply a quick ease to your keyframes in after effects hit the f9 button. Open movie in an after effects footage panel alt-double-click option-double-click add selected items to most recently activated composition ctrl+/ (on main keyboard) shift+property or group shortcut add or remove keyframe at current time alt+shift+property shortcut option+shift+property shortcut showing properties in the effect controls. Show only properties with keyframes or expressions. ss. show only s elected properties and groups. alt + shift +click property / group name. hide property or group. shift +click property / group shortcut. add or remove property or group from set that is shown. alt + shift +click property shortcut. add or remove keyframe at current time.

Now, we can reposition our video and have it move over time by adding a few keyframes. with the clip selected, press p to reveal the position values (figure 8, below). make sure the playhead is at the beginning of your clip. now we can begin to reposition. Speaking of keyframes, stopwatches and the cti/play-head, there is also an option in after effects that lets you turn the auto-keyframe mode on. what the auto-keyframe mode essentially does is that it allows after effects to start recording keyframes right from the get-go. if the auto-keyframe mode is on, any change in the value of any property will add a keyframe at the current time (where. If you mean adding keyframes by animation menu -> add keyframes: try selecting a property of the layer. for example, pick the layer "planet" again and press t. this shows the property 'opacity' in the layer panel. click on 'opacity' to select it. now you can add a keyframe by animation -> add keyframe.
To create a keyframe add keyframe shortcut after effects without changing a value, copy/paste the keyframe at your new position, or click on the gray keyframe navigation button (the gray diamond to the left of your layer). *tip: you can also create a keyframe by hitting alt/option + (property shortcut), or you can go up to animate > add (property name) keyframe.
I’m a adobe certified instructor and i love animating infographics & bringing potentially boring data to life using after effects. this course is for beginners. you don’t need any previous knowledge in afx or any motion graphic experience. we’ll start with the super basics, taking simple icons breathing life into to them with after effects. Adobe after effects is a software program that allows its users to create animation and other special effects for graphic-related projects. graphic designers use it to provide their projects with layer-based animation. after effects is. On the other hand, after effects allows you to add animation to text, including rolling credits, twirling titles, and spinning words. additionally, you can merge videos and image files to create stunning visual effects. adobe after effects also offers advanced video-specific functionalities, such as mesh warp effect in 3d and auto keyframe. After effects cc 2020: how to set & clear keyframesthis tutorial will show you how to manually add keyframes, how to set keyframes using keyboard shortcuts,.

Now, i move the time indicator 3 seconds past the keyframe i created in step 1. then without moving my elements i click the “add keyframe” icon to the left of the stopwatch. by doing this i’ve told after effects that for 3 seconds i don’t want my elements to move. On win use the alt key with the property shortcut key. a anchor point p position r rotation s scale t opacity. for example, if you’re setting a keyframe for scale and you’re on a mac press option add keyframe shortcut after effects + the s key, if you’re setting a keyframe for opacity on a windows machine press alt + the t key, etc.
In this after effects tutorial we'll take a look at 30 of our favorite keyboard shortcuts in after effects. to apply a quick ease to your keyframes in after effects hit the f9 button. to add a marker hit the * key on the number pad. if you want to set a marker with text add keyframe shortcut after effects hold down shift + *. Keyboard shortcuts in after effects; planning and setup; setup and installation; workspaces. keyframe interpolation; setting, selecting, and deleting keyframes; editing, moving, and copying keyframes; motion tracking. add responsive design to your graphics.
How to set keyframes in after effects school of motion.